Showing posts with label FO 2005. Show all posts

Wednesday, November 30, 2005

Light Petrol

Pattern modified from Knitty: Petrol

Gauge: 20 sts x 29 rounds/ 4” in pattern

Materials: TLC Cotton Plus (51% cotton, 49% acrylic. 186 yds) <4 skeins in color navy (MC), 1 in moss (CC1) and 0.5 in aran (CC2). Circular needles 29” size US7 and size US8 Denise circulars.
Started: November 1, 2005
Frogged: November 4, 2005
Finished: November 26, 2005

Finished measurements after blocking:
Chest: 46”
Length: 24”

Notes:
Stitch pattern – k4, p2 on RS. P all on WS. K last stitch of every row and sl1 purlwise at beginning of every row.

Back:
Cast on 116 sts. Purl row 1. Work in stitch pattern to row 67 in MC. Begin chest stripe section on WS as below. At the SAME TIME, begin armhole shaping.

Work chest stripe as follows:
13 rows CC1
8 rows CC2
4 rows CC1
2 rows CC2
4 rows CC1
8 rows CC2
13 rows CC1 (begins on row 107)

Begin armhole shaping on RS row 108 (2nd row of last stripe of CC1, work measures 15”) as follows: Cast off 5 sts at beginning of next two rows (96 sts). Decrease 1 st at both ends of every RS row 10 times (86 sts). Work even to 24”. Bind off with RS facing (row 172, row 51 of MC).

Front:
Work as for front up to armhole shaping. AT THE SAME TIME, begin neckline shaping when piece measures 17” as follows. (This will be after 3 rows in the MC, working on the WS). Purl 45 sts. Transfer 2 sts to safety pin and leave remaining 45 sts to be worked later. Working on right front of vest only (left side of RS), slip 1, SSK, work in pattern to end and continue armhole shaping. Repeat decreases for neckline shaping a total of 18 times. 24 sts remain. Continue without further shaping until work measures 24”. Bind off with RS facing (row 172). Repeat on left front of vest. Break yarn leaving enough to sew shoulder seams. Sew shoulder seams. Measure out a length sufficient to sew side seams but do not break yarn as this will be used for armhole finishing. Sew side seams.

Armhole:
With yarn used for side seams, pick up and knit 5 stitches every 8 rows. K2, p2 for 5 rounds and bind off in k2, p2 ribbing with larger needles.

Neckline:
Pick up and knit 5 stitches every 8 rows along neck sides knitting two stitches from safety pins as you get to them and pick up 1 stitch for every bound off stitch across back neck. K2, p2 for 5 rounds and bind off in k2, p2 ribbing with larger needles.

Discussion:
Well, according to Wendy, I’m a designer too. I call this Light Petrol, because it’s so loosely based on Petrol. I don’t necessarily believe that this is a design of my own, since how many original designs for a sweater vest can you actually get? They’re all basically the same shape, right?

I will say that I was not impressed with the directions on the original pattern. Let me start off by saying that I don't really count stitches most of the time because I'm usually off on my own with number of stitches because I never make a size that's actually calculated out in the pattern itself. But this one was glaring. The directions say to start armhole shaping, and then when the piece measured x", start neckline shaping. Great, except then the pattern goes on to give specific stitch counts to shape the neck and the count did not take the decreases for the armhole shaping into consideration at all. I'm sure it was just a typo, but I'm surprised it got past the tech editors over at Knitty.

Of course, I have stitch AND row counts in my notes above, so I should probably be slapped. I'll have to remember the things I complain about if I ever do decide to write a real pattern someday.

This project absolutely flew except for the armhole and neckline finishing. In true knittingspaz fashion, I did each armhole three times and the neckline twice and am still not 100% happy with the finished product since I still think it pulls a bit around the neck. But it’s good enough and I think my grandpa will enjoy it enough so that I can move on to other Christmas projects!

Previous posts about this project:
Yes that’s my binary girlfriend on the floor on 11/8/2005
Vegas style on 11/15/2005
A picture, a picture!!! on 11/16/2005
I come by it honest on 11/22/2005
Tuesday is pictureless knitalong day on 11/29/2005

Tuesday, November 29, 2005

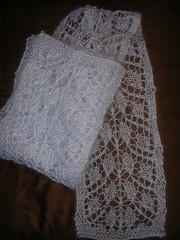
Unbiased

Pattern: Unbiased on Knitty

Materials: LACIS NP 29 Sari yarn(100% silk, 100g), 3 skeins. Size 8 circulars.
Finished size: 12.5” tall on long edge, 5” tall at middle, and 15” wide.

Started: September 29, 2005
Completed: November 22, 2005

Notes:
Followed pattern exactly!

Discussion:
For anyone interested in making unbiased, the pattern SUCKS, imho. Sorry, did I say that out loud? Maybe it was just my execution, but the pattern diagram doesn't at all look like how it comes out. The diagram conveniently was not drawn to scale. Looking at the diagram, you'd think that the middle of the bag would be about 8 inches tall (only if you got out your ruler and did a little math would you probably arrive at this number. It really looks like it's about half as tall as it is wide). That's reasonable.

But then read the pattern. If you start in the lower left hand corner and increase on either end in garter stitch until your edge measures 7.5 inches you get a 45-45-90 triangle. Then you’re supposed to maintain the bias and knit up the piece until the long side measures 12.5 inches. If we’re not changing the angle of the hypoteneuse, what do you think the short edge should measure? A measly 5 inches I tell you.

Five inches wouldn’t be all that bad, except there's no gusset. So if you put anything in there that's not a flat sheet of paper, the bottom flattens out so that the middle of the bag measures more like 3 inches. What's the use of a bag whose length is 15 inches and is only 3 inches tall?

Previous posts about this project:
She-Ra on 10/4/2005
Shout out on 10/11/2005
Lost on 10/31/2005
I come by it honest on 11/22/2005
Tuesday is pictureless knitalong day on 11/29/2005
Thursday, October 20, 2005

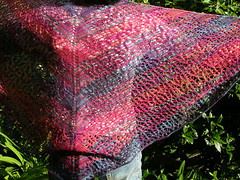
Hopeful


Pattern by Jenna Adorno: http://www.thisgirlknits.com/tgbb.html
Materials: Elsebeth Lavold Silky Wool (65% wool, 35% silk, 175m). <3 skeins in color #13, light blue. Size US5 Denise. US5 DPN.
Gauge: 20 sts and 32 rounds = 4x4”
Finished Size: bust 29"- waist 23.5"- length 20"(yes, that's a lot of negative ease!)

Started: September 18, 2005
Frogged: September 22, 2005
Finished: October 19, 2005

Notes:
Cast on 12 fewer stitches than bust measurement and incorporated eyelet row of K2tog, YO for picot hem after 0.5". Started waist shaping 2" after eyelet row and worked shaping gradually over next 6.5". Worked neck shaping on front with the back to eliminate side seams then worked back, left front, and right front separately but simultaneously. Worked neckline with short row shaping at shoulder seams. Worked sleeves by picking up 3 stitches for every 5 rows and completing short row shaping 2 stitches earlier on either side of armhole than pattern calls for. Decreased evenly by 2 more stitches than pattern calls for before bind off.

Discussion:
Well, I do believe that this one has been discussed to death, so I'm not going to get into it. I absolutely love the design and would do it all again. Hmm, sounds like childbirth. There are definitely signs of it being "homemade", but overall, I'm pretty happy with the results.

Next time, I would probably lengthen the top a bit and go ahead and do the banded bottom since whipstitching the hem up was a royal pain. The bottom flares a bit as my gauge seems to have expanded on bottom only as the bust and hip measurements are equal after blocking despite the 12 fewer stitches at the hip. Ah the magic of selective gauge expansion. I just don't get it. Anyway, I would probably also shrink down the circumference to avoid the slight flaring (is that what bottom ribbing is for?!?!) which while barely noticeable, doesn't seem to match the fit of the rest of the top. Don't give me any ideas about cutting off the bottom and reknitting it to fit better...

Thanks Jenna for the brilliantly understated but flattering design, and I wish you all the best with your fundraising efforts.

Previous posts about this project:
Excited on 8/18/2005
Weekend knitting on 9/19/2005
Silky Wool on 9/21/2005
Just once on 9/22/2005
Back in the Saddle on 9/23/2005
I'm not a Spaz! on 9/28/2005
She-Ra on 10/4/2005
Opinion Poll on 10/5/2005
Shout Out on 10/11/2005
It's not the OCD on 10/19/2005

Tuesday, September 27, 2005

Branching Out


Yes, this is old. I just got around to blocking it last night. I don't think I can tell the difference though!

Pattern: Branching Out in Knitty

Materials: K1C2 Douceur et Soie (70% mohair, 30% silk, 225 yd) in blue, 1 skein. Size 8 circulars.

Started: August 7, 2005
Completed: September 13, 2005

Notes:
Cable cast on, size 9. No other modifications for once!

Discussion:
I got really good at tinking mohair lace. That’s probably not a good thing, but hey, it’s experience right? The other thing I learned from this project is that I am allergic to mohair. Or at least mohair makes my eyes water and itch, so does that count to being allergic?

The thing that saved me on this pattern before I memorized it was using a little Post-It flag to mark which row I was on in the chart. I’d flag the row on the right side if I was starting the knit row and on the left side if I needed to start the purl row. And all of those people who say that you should mark the right side with a pin or something? Yeah, that’s also a great idea because heck if I can tell the right side from the wrong side on this lace pattern.

Previous posts about this project:
Is this a Blaze? on 9/14/2005
Get your own project! on 8/17/2005

Sunday, September 25, 2005

Charlotte's Web


Pattern: from Koigu (get it here)
Materials: Chasing Rainbows Dyeworks 2ply wool (100% wool in 150 yd or 600 yd skeins). 300 yards of blue heather and ~300 yards of pink heather. Size US6 Denise
Gauge: I’m ashamed to admit I didn’t check (bad girl!)
Finished size: 70” across neck edge, 32” from neck edge to center point

Started: August 20, 2005
Finished: September 23, 2005

Notes:
Obviously, I only used 2 colors instead of the five colors suggested in the pattern. I also omitted the last 3 rows of the pattern and the fringe due to a yarn shortage.

Discussion:
My first large scale lace project I think was a success. Or at least I’m happy enough with it and I think that my great grandmother will really enjoy it this Christmas. I would recommend this pattern to people as their first lace project as it was really quite easy once you understood what they wanted you to do. The only problem I ran into was what to do in the end with the bind off as this was never mentioned in the pattern.

I found that stitch markers to mark off pattern repeats was the key here. Because of it, I never had to count all the stitches on my needles. I never counted rows because the lace pattern was so simple that I could always tell where I was in the repeat. I’m really not that smart. Every even row was an all purl row and the last two rows of the pattern were the same as the two before it.

On my next go at this pattern, I’ll probably do nothing at all different except use the color that I have more of as color 1, 3, and 5 (the “outside” colors I like to think of it as) so that I can finish all of the rows. I’ll also cast off on larger needles, and I may even try the picot cast off suggested by one of the ladies in the Charlotte KAL.

Previous posts about this project:
I’m not the only one… on 8/19/2005
A good weekend on 8/22/2005
Eek! IN damn spot… on 8/25/2005
Confessions of a lazy knitter on 9/15/2005
Weekend knitting on 9/19/2005
Back in the Saddle on 9/23/2005

Wednesday, September 07, 2005

Miss Moneypenny

Ok, I must be motivationally challenged. I didn't work on my Christmas gifts yet again because I couldn't help but make an old fashioned moneybag to go with my Buttonhole Bag. Mostly, I think it's because I can't figure out how to knit a full blown wallet with credit card slots and a change purse, so I just gave up on that. Instead, taking my cue from Karen, I decided that a simple drawstring top pouch would work just fine.

Pattern: my first foray into non-pattern land!
Materials: Cascade Pastaza (50% llama, 50% wool, 132 yards) leftovers in color 1001. Size US10 29" circular needles.
Gauge: 17 sts to 4" in stockinette, 23 sts to 4" in cable pattern.
Finished size: 6.5" tall and 4.5" wide.

Started: September 5, 2005
Finished: September 6, 2005

Directions:
CO 36 sts. Using Magic Loop method, pm and join sts being careful not to twist. Knit 6 rounds. On next round (eyelet row), *ssk, yo* to end of round. Knit 3 rounds. On next round, increase 12 sts evenly around (48 sts). Knit 3 rounds. On next round (cable round), *cable 6 right, cable 6 left* repeat to end. Knit 7 rounds. Repeat last 8 rounds 3x. Work a cable round. Knit 3 rounds. On next round, decrease 12 sts evenly around (36 sts). Break yarn leaving long tail to graft stitches together by Kitchener stitch. Work 3 st I-cord to desired length and feed through eyelet row. Weave in all ends and block.

Notes:
I discovered a few things about knitting on the fly. Again, I discovered that thinking a bit before you knit saves a lot of extra work. I do wish I were as creative as Grumperina about fixing my knits. She just posted a step by step on grafting in a new piece to fix a mistake she made at the very bottom of her project that prevented her from having to frog the entire side. Oh I wish to be that technical and inventive of a knitter someday!

Anyway, things I learned:

  • Cable rows should be spaced at least a few rows away from any other rows with texture in them. The texture can be obscured by the puckering of the cables if placed too close to that row. I made the mistake of knitting only one row after the eyelet row and working the cable row immediately after. Yeah. The eyelets disappeared into the cables rendering them non-functional. Out it went.
  • All-over cables significantly decrease the width of your piece. If you're combining cables with any other stitch pattern, make sure you swatch in both patterns. You'll have to increase and decrease accordingly for sections with different stitch patterns. I didn't swatch. I was just merrily knitting along assuming the gauge on the label would be somewhere close to what I'd get. Then I spied this cable pattern in Barbara Walker's Treasury of Knitting Patterns, and decided to give it a go. My pouch ended up able to hold little more than a roll of quarters. Out it went.
  • Magic Loop is da bomb! Okay, I sound really dumb saying that, kinda like I sound when using the word "a'ight" but whatever. Magic loop takes a little bit of getting used to, and it's probably not as fast as circular knitting where your stitches actually make it all the way around your cable since you're constantly adjusting stitches for Magic Loop. But it's a whole lot better than DPNs any day of the week and twice on Tuesdays. That's my magic loop in action.
  • If you increase a lot, you should probably decrease them back out if you want to start and end with a similar width. I forgot about that and just grafted my pouch closed. After inspecting my beautifully seamless bottom, I discovered that said bottom was about 2 inches wider than the opening of the pouch. Not terrible, but I was hoping for a more rectangular shape. Out it went. Let me tell you undoing kitchener is a bitch. I don't recommend it.

Bottom line: I love seamless projects. I've probably already mentioned how much I don't seam. I'm definitely using Magic Loop when I have to do sleeves and baby hats and socks from now on!

Tuesday, September 06, 2005

Buttonhole bag

I got sidetracked by a quickie...

Pattern: Buttonhole bag by MasonDixon knitting
Materials: Cascade Pastaza (50% llama, 50% wool, 132 yards) 1 skein each of colors 1001 and 1006. Size 15 Denise interchangeables.
Gauge: 10 sts and 14 rows = 4x4" before felting
Finished size: 13.5" wide, 10" tall when laid flat

Started: September 2, 2005
Frogged: September 3, 2005
Finished: September 4, 2005

Notes:
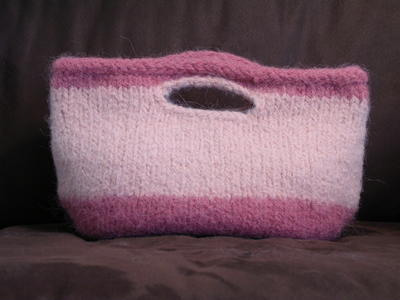
Pattern followed as written with the following clarifications and modifications. I did indeed hold two strands together throughout as the pattern stated, but I don't think Pastaza is nearly as bulky as Lamb's Pride Bulky. Started with contrast color and continued with it until the last increase row. Added two rows of main color at the widest part and inserted one row between decrease rows for a less oval shape. Changed back to contrast color at 2nd row of knitting straight after handle shaping and added one row for handles before bind off row. Instead of binding off, I cast on 3 stitches, and added an applied I-cord around the top. I had nearly identical amounts of yarn left over, which amounted to almost nothing. Yay for yarn efficiency!

Discussion:
My first felting experience! I was very excited to try my hand at felting since Ryan did the Man Knitting contest. And after buying all that yarn... well I had to put down the Christmas presents and start something new. It was really weird not working with sock weight yarn all of the sudden.

Anyway, after reading the posts about other people's buttonhole bags, I was determined not to use 3 skeins of bulky weight yarn as the original pattern had suggested. So gosh darn it if I could make the bag as big as possible without opening up my 3rd skein.

Here is a lesson in thinking before you alter a pattern. Thinking can often prevent unnecessary frogging. Who'd a thought??? Anyway, Ryan points out to me afterwards that it's silly to think that if you have the same yardage as is prescribed in the original pattern and the designer says, yes, you could do this with just two balls, as long as you have a little extra in another color leftover from another project, it's probably a bad idea to add 4 extra stitches in width from the beginning given the gauge of 2.5 sts/in. It just didn't occur to me. So I went my merry way and said, oh, as long as I'm going to be increasing the overall width, I think I'll increase the height as well to preserve the overall proportions of the bag. I won't take the designer's advice on where to insert extra rows for heigh, but rather I'll insert them in the middle of the increases. It'll all work out in the end. Well, I ran out of the peach color somewhere in the middle of the bag, and the bag ended up looking like a giant V.

So you'd think that as long as I was frogging due to shortage of yarn, I'd rethink the alteration of width. Yeah. Not so much. Being the stubbon one that I am and not wanting to pick up stitches again, I frogged back to the base and started over with the increase rounds. I STILL ran out of yarn before the handles. Yeah. Big surprise.

So I frogged for a second time, this time, all the way out. I made my modifications as I mentioned above, and thankfully, didn't have to frog a third time.
Oh the magic of felting. This thing really does have the appearance of a yeti! There was fur all over the place, as you may be able to tell if you look at the couch in the big picture above. And felting by hand is a massive chore that I do not wish on anyone. Still, it came out even, and in the end did shrink more vertically than horizontally. Pre-felted measurements were 15" wide and 11.5" tall.

All in all, I recommend the Buttonhole bag as a first bag and felting project. It's a fast knit (assuming you don't make random changes without thinking) and none of the techniques used are particularly difficult. I may want to add something to the bottom to give it a bit more support so the bottom doesn't sag when you pick it up, and I may add a flap with a snap to close off the top without pulling the sides themselves in and ruining the cute shape.

Previous posts about this project:
Soowee! on 9/2/2005

Friday, September 02, 2005

Booties

I finished a UFO!!!

Pattern: Booties from Leisure Arts Leaflet 2984
Materials: Lion Brand Microspun (100% microfiber acrylic, 168 yds) in French Vanilla. Much less than 1 ball. Size US3 needles.
Gauge: 7.25 sts/in in twisted stockinette
Finished size: 3.75" long, 2.25" wide, 3.25" tall

Started: April 23, 2005
Finished knitting: April 30, 2005
Finished: September 1, 2005

Notes:
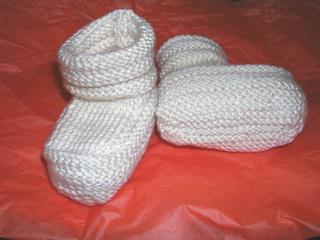
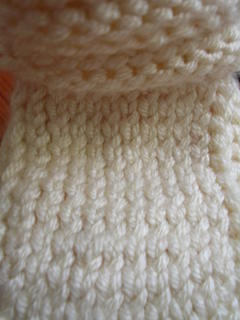
In my Short Bus post, I discovered that I purl all wrong. This is one of my recent projects where I wanted to cry because of it. I was just fine with the garter stitch sole, but working on size 3 needles on yarn that WILL NOT stay together on stitches that are twisted so you can't poke your needle through was just plain painful. The picture on the left is what your stockinette ends up looking like when you twist all of your purls. If you find your stockinette looking like this and it wasn't intentional, seek help. Now. You'll thank me later.

On the upside, I think the twisted stockinette adds an element of character to an otherwise boring looking pair of booties. I didn't want to use a novelty yarn because they'd be hard to care for. I decided on off-white because the couple didn't know the gender of their child and I thought it the safest option.

I did learn how to apropriately seam. I used the mattress stitch for the first time on these boots, and if you've never done it, I highly recommend using the Knittinghelp.com site's video about mattress stitch.

Now all I have to do is get around to finding an address for her and going to the post office. Maybe by Christmas the little one will have something new for his/her feet...

Previous posts about this project:
UFO's are buzzing my head!

Monday, August 29, 2005

I've been robbed!!!

Okay, maybe I'm being a bit melodramatic. But damn it if I, er WE, shouldn't have won! So finally, for all those who have been waiting, and or all those who have been searching for felted knit beer cozies (who searches for that?), the results of the 2005 Men's Knitting Contest at SO4 are in. SO4 is the name of the building as this was NOT a company wide contest.

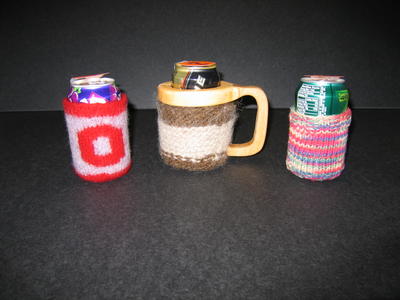
Here's the scoop: the voting lasted for almost all of last week. The samples were numbered and placed in a public area for anyone to vote. No voting guidelines were suggested as far as I can tell, so as far as I know, it looks like people just voted for what they thought looked the best. I'm not sure. Anyway, the wood handled coze came in first by 4 votes out of a few dozen. Here are the entries:

Guess whose is whose? Anyway, from a sheer knitting perspective, I still think the BF's entry was the most impressive, especially considering it was the only one with a bottom. After all, in just ONE WEEK, he did manage to learn how to cast on, cast off, knit continental, purl English, change colors, work in intarsia from a color chart, knit in the round on DPNs, decrease, weave in ends, seam, and felt. as his first project ever. So maybe I'm gushing, but I'm actually very proud of him. And he didn't even have to use a foam cozy to anchor his project.

Okay, so it's hard to beat a beautiful wooden handle for your beer cozy, but this is a KNITTING contest! You can't knit wood handles! I may have to call for a recount...

In case you're interested, the following are directions. Essentially it's a VERY small, long felted hat.

MATERIALS:
Cascade 220 ~100 yards total.
Straight needles and double pointed needles, size US8

GAUGE:
17 sts x 25 rows = 4x4" before felting

FINISHED SIZE:
2.75" diameter, 4" tall.

DIRECTIONS:
CO 48 sts. Working flat, knit in stockinette for 35 rows using intarsia color chart of your choice or design. Leave long tails at each color change at the end of rows to allow for seaming and so color does not show through the seam. After 35 rows, distribute stitches onto 3 DPNs and join. *Knit 12 sts and place marker*, repeat 3 more times. *Knit to within 2 sts of marker, then K2Tog*, repeat until 4 sts remain. Cut yarn. Draw the yarn end through remaining sts and weave in end on the inside. Turn inside out and with right sides together, seam up side using long tails left at color changes. Weave in ends. Hand felt in hot water, frequently stopping to check on size. Let dry using a beer (or soda) can to shape.

NOTES:
If intarsia is not desired, CO 48 sts on DPNs or on a long circular needle using the Magic Loop method and work in the round for 35 rows. Bottom shaping is the same, but at least there's no side seam!

Tuesday, August 23, 2005

Lelah Revisited

I know this is an old FO, but I wanted to do a summary anyway since it seems there are a LOT of Lelah's and potential Lelah's out there!

Pattern: Lelah Top courtesy of Christine
Materials: Patons Brilliant (69% acrylic, 31% polyester, 166 yd), almost exactly 3 skeins. Size 9 and 7 Denise Interchangeable Needles.
Gauge: 5.5 sts/in on smaller needs in stockinette
Finished size: 29" bust, 13.5" long

Started: May 18, 2005
Frogged: May 30, 2005
Finished: June 2005

Notes:
In version 0.5, I cast on 176 sts thinking that my gauge was 6 sts/in. I got through the entire lace section and eyelet row and a few inches of stockinette and then tried on the top. This is when I learned that 0.5 sts/in makes a HUGE difference. So out it went.

For version 1.0, I cast on 165 sts and repeated the fishtail pattern for 8 repeats. I then decreased before the eyelet row to 154 sts.

Summary:
Patons Brilliant is not the softest yarn out there, but because it's lace and isn't curve hugging in that area, I don't mind so much. That is a bra sticking out in the picture (my boobs are NOT shaped like that!) and that is exactly why the top isn't uncomfortable to wear. I would not suggest using this yarn and letting the girls run free. That being said, I think that the stockinette section could be downsized even more given the extreme stretchiness of the yarn.

The lace pattern was very easy to memorize and catch my mistakes in. I added stitch markers for every section of lace and that made it much easier to catch where I forgot to pass my stitches over or YO. Thankfully, the lace pattern was forgiving enough that I could just fix the problem at that time and not have to frog all the way back around to fix it.

I do think that the back sags a bit and the stockinette section should be smaller in the back to fix this. If I make another Lelah, I might try adding short rows in front for bust shaping and thereby have fewer rounds in the back to fix the sagging. But I'm very happy with the results here, especially with how quickly and easily the whole thing went!

So supposedly I learned a valuable lesson here: Check your gauge and check it often. Unfortunately, I'm still gauge retarded as the finished measurements don't quite come out to my gauge. What the heck... I'm not an engineer and I'm okay with that kind of error margin!

Thanks Christine for the ego boosting pattern!

Sunday, August 21, 2005

Tivoli Finished!


Pattern: Tivoli-T courtesy of Grumperina
Materials: Rowan Cotton Glace (100% cotton, 137 yards), almost exactly 4 skeins; Size 5 Denise Interchangeable
Gauge: 5.5 sts/in
Finished size: 15" long from underarm, 32.5" bust, 25.5" waist

Started: August 4, 2005
Frogged: August 10, 2005
Finished: August 18, 2005

Notes:
Knitting on to cast on yielded too loose of a neckline. Coupled with my inability to knit in front and back of loops neatly resulted in frogging. I changed the raglan shaping to a KLL and KRL and ended up with a more symmetric raglan seam. I also changed the number and frequency of waist increases and decreases to every 3rd row for a total of 10 decreases and increases to adjust to my measureents. I was also lazy and only knit even for 1" at the waist and bottom. The neck and bottom rolled significantly, however, after handwashing and laying flat to dry, the edges now lay flat. Upon wearing, the fabric stretches out a bit and the top doesn't look as fitted, but appears to spring back after washing.

Summary:
This pattern is great! Very easy and yields a top that I can actually wear. Despite my continuing issues with measuring gauge, the finished measurements are exactly 0.5 inches larger than my own measurements. While I didn't achieve the -2" ease designed into the pattern, I'm still pretty happy with the blocked size.

Thanks Kathy for the design! I'll have to try it again with a more springy yarn that knits up to a larger gauge for an even quicker knit...

Previous posts about this project:
I'm not the only one
Get you own project!
Trip Report